The ESI bit is a special bit in the CAN FD message. It is located after the BRS bit.
Continue reading “The ESI bit in CAN FD messages”
Category: Misc
UDS Basic Firmware Download
The UDS basic firmware download process is the defined sequence of UDS services to download a new firmware to an UDS bootloader. It is the default sequence support both by emotas UDS bootloader and emotas CAN UpdateManager. Additionally, it is supported by the UDS PlugIn for the CDE.
Continue reading “UDS Basic Firmware Download”
ISO-TP addressing formats
ISO-TP is a transport protocol defined in the ISO-Standard ISO15765-2. It defines a transport layer protocol on top of CAN or CAN FD to transfer payload larger than 8 resp. 64 bytes which is the maximum frame length of CAN resp. CAN FD frames.
Normal addressing
Normal addressing use the CAN identifier only to address a device. Both 11-bit CAN identifiers and 29-bit CAN identifiers may be used.
The definition which CAN identifiers shall be used is not in the scope of the ISO-TP standard, but defined by higher layers using ISO-TP.
Normal fixed addressing
Normal fixed addressing requires the use of 29-bit CAN identifier only. It basically follows the J1939 addressing scheme using the J1939 PGNs 0xDA00 and 0xDB00 and a J1939 priority of 6. The source address is encoded in the lower 8 bit of the CAN ID and the target address is encoded in the bits 8-15 of the CAN-ID.
Extended addressing
Extended addressing extends the normal addressing format by an additional byte. The first byte of the CAN frame is part of the address.
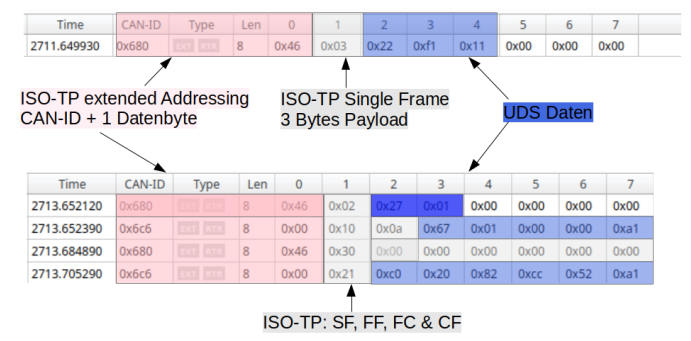
The definition which CAN identifiers and data byte shall be used is not in the scope of the ISO-TP standard, but defined by higher layers using ISO-TP.
Mixed addressing
Mixed addressing is used for remote diagnotics and can be used with both 11-bit CAN IDs and 29-bit CAN-IDs. When using 29-bit CAN-IDs it basically follows the J1939 addressing scheme using the J1939 PGNs 0xCE00 and 0xCD00 and a J1939 priority of 6. The source address is encoded in the lower 8 bit of the CAN ID and the target address is encoded in the bits 8-15 of the CAN-ID.
Additionally, the 1st byte of the CAN frame is used as an address extension.
Known implementations
emotas’ ISO-TP stack supports Normal addressing, Normal fixed addressing and Extended Addressing.
UDS Firmware Download (UDSonCAN)
Read LoRaWAN data from TTN server
TTN – The Things Network
https://www.thethingsnetwork.org/
Our LoRaWAN sensors use the service of The Things Network. So our LoRaWAN gateway sends the sensor data to the TTN server. The sensors are registered with an ‘application id’ and a ‘device id’.
https://console.thethingsnetwork.org/
Now I want to receive the data on my PC. The TTN server allows to use MQTT.
https://www.thethingsnetwork.org/docs/applications/mqtt/quick-start.html
Note: Currently only the up-topic is working and get the data in JSON format.
https://status.thethings.network/
mosquitto – https://mosquitto.org/
Please read the base information on
https://www.thethingsnetwork.org/docs/applications/mqtt/quick-start.html
We want to subscribe using TLS. The access schema seems to be a little bit different. In our case only with the option ‘-L’ it was possible to switch to TLS communication:
mosquitto_sub.exe -L mqtts://<AppID>:<AppKey>@<region>.thethings.network:8883/+/devices/+/up –cafile mqtt-ca.pem
We receive
{
  "app_id":"stm32_example_usi_expansion_board",
  "dev_id":"sensor-ro-20200522",
  "hardware_serial":"E24F43FFFE44C1EF",
  "port":99,"counter":605,
  "payload_raw":"AHMnSwFnARYCaFADAGQEAQAFAdc=",
  "payload_fields":{
    "barometric_pressure_0":1005.9,
    "digital_in_3":100,
    "digital_out_4":0,
    "digital_out_5":215,
    "relative_humidity_2":40,
    "temperature_1":27.8
  },
  "metadata":{
    "time":"2020-07-03T14:02:59.272943586Z",
    "frequency":868.1,
    "modulation":"LORA",
    "data_rate":"SF9BW125",
    "airtime":246784000,
    "coding_rate":"4/5",
    "gateways":[
      {
        "gtw_id":"eui-3133303735005600",
        "timestamp":920207212,
        "time":"",
        "channel":0,
        "rssi":-44,
        "snr":11.75,
        "rf_chain":0
      }
    ]
  }
}
Python
Our solution is based on the package paho-mqtt.
https://pypi.org/project/paho-mqtt/
At the first you have to install it to your python environment. Possible you have to update your paket manager at the first.
example Win10: (of course python should be installed already)
cd Python37-32
python -m pip install --upgrade pip
cd scripts
pip install paho-mqtt
Now start the python shell – IDLE (Python 3.7 32-bit)
Load/create the small script mqtt.py. It print the sensor value temperature.
import paho.mqtt.client as mqtt
import json

# The callback for when the client receives a CONNACK response from the server.
def on_connect(client, userdata, flags, rc):
    print('Connected with result code '+str(rc))
    client.subscribe('+/devices/+/up')

# The callback for when a PUBLISH message is received from the server.
def on_message(client, userdata, msg):
    ergebnis = json.loads(msg.payload)
    values = ergebnis['payload_fields']
    print(values['temperature_1'])

client = mqtt.Client()
client.on_connect = on_connect
client.on_message = on_message
client.tls_set()
client.username_pw_set('AppId',password='AppKey')

client.connect('eu.thethings.network', 8883, 60)

client.loop_forever()
Of course you have to configure your AppId and AppKey.
Output:
Connected with result code 0
27.9
27.9
27.9
27.9
27.8
27.9
27.8
27.8
27.8
27.8
27.8